Breaking

Showing posts with label Blogging tricks. Show all posts

Saturday, September 02, 2017

3:54 am

How to Add Follow Buttons to Your Blog


This is no new trick and theres no need for long story in getting this done as it is just some click away from getting this done. Basically what follow buttons do is that they link your readers to your social media pages in which you get to have more likes on your social media pages more subscribers to your channel . So to add this follow buttons to your blog you need to go.The reason for adding this post is that, recently i noticed people makes use of adblockers more often which wouldn't make the share buttons appear. So on this post i would be sharing the script you can make use to add share buttons to your blog which wouldn't be blocked even when the user makes use of adblocker.

Steps to add follow buttons to your blog.

»Firstly, log to your blogger dashboard  and locate Layout on your dashboard.

Add follow buttons to blog_Naijabrainies


»Decide wherever you want the buttons to be placed on your blog and click on add gadget then select  HTML/JAVA. and click on the +button.


»Then paste all the codes below in the box provided. 

<link href='//netdna.bootstrapcdn.com/font-awesome/4.2.0/css/font-awesome.min.css' rel='stylesheet'/>
<style>
.gvusion-socials-icons{margin:0 0 20px 0}
.gvusion-socials-icons ul{margin:0;padding:0;list-style:none;margin-bottom:-5px;margin-right:-5px;overflow:hidden}
.gvusion-socials-icons ul li:before{display:none}
.gvusion-socials-icons ul li{margin:0;padding:0;list-style:none;float:left;width:45px;height:45px;line-height:45px;text-align:center;background:#00baff;font-size:21px;margin-right:5px;margin-bottom:5px;opacity:.9;border-radius:3px;}
.gvusion-socials-icons ul li:hover{opacity:1;}
.secondary-sidebar .gvusion-socials-icons ul li{width:36px;height:36px}
.secondary-sidebar .gvusion-socials-icons ul li a{line-height:45px}
.secondary-sidebar .gvusion-socials-icons ul li a i{font-size:20px}
.gvusion-socials-icons ul li a{line-height:45px;display:block;color:#fff}
.gvusion-socials-icons ul li a:hover{color:#fff}
.gvusion-socials-icons ul li.home{background:#83868a}
.gvusion-socials-icons ul li.facebook{background:#516ca4}
.gvusion-socials-icons ul li.googleplus{background:#f20000}
.gvusion-socials-icons ul li.rss{background:#f29400}
.gvusion-socials-icons ul li.youtube{background:#f20000}
.gvusion-socials-icons ul li.dribbble{background:#dc71a6}
.gvusion-socials-icons ul li.deviantart{background:#4c5e51}
.gvusion-socials-icons ul li.pinterest{background:#f20000}
.gvusion-socials-icons ul li.instgram{background:#406f94}
.gvusion-socials-icons ul li.tumblr{background:#395875}
.gvusion-socials-icons ul li.linkedin{background:#1985bc}
.gvusion-socials-icons ul li.soundcloud{background:#f60}
</style>
<div class="gvusion-socials-icons mom-socials-widget">
<ul>
<li class="facebook"><a href="http://www.facebook.com/naijabrainies" rel="dofollow" target="_blank" title="Follow us on Facebook"><i class="fa fa-facebook"></i></a></li>
<li class="twitter"><a href="http://www.twitter.com/mypage" rel="dofollow" target="_blank" title="Follow us on Twitter"><i class="fa fa-twitter"></i></a></li>
<li class="googleplus"><a href="https://plus.google.com/mypage" rel="dofollow" target="_blank" title="Follow us on Google+"><i class="fa fa-google-plus"></i></a></li>
<li class="instagram"><a href="https://www.instagram.com/mypage" rel="dofollow" target="_blank" title="Follow us on instagram"><i class="fa fa-instagram "></i></a></li>
<li class="youtube"><a href="https://www.youtube.com/channel/mypage" rel="dofollow" target="_blank" title="Follow us on Youtube"><i class="fa fa-youtube "></i></a></li>
<li class="pinterest"><a href="https://www.pinterest.com/mypage" rel="dofollow" target="_blank" title="Follow us on Pinterest"><i class="fa fa-pinterest "></i></a></li>
</ul>
</div>
Read also:How to add Flying Twitter Bird to Blogger

Save and reload your blog to see the new change on your blog.

Are you having any issue with any of our post or you have suggestions? please feel free to drop your comment. Be social, Tell us what you think.

Wednesday, August 02, 2017

9:40 am

How to Remove Footer Credits and Stop Redirection

Normally, When you download a free template it comes with footer links which links the template to the person who created it and which i would say no blogger would like to keep or spare. Some templates footer links remover are easy and straight while some are somehow tricky. The moment you remove some portion of code or name from the footer credit and you save changes and also
refresh your blog, it takes you to their own website. Its very simple to stop the redirection.When you try to inspect the element with your web browser, you will see the contets to be edited but in your html you wouldnt see it simply because it is hidden There are many ways people get this stuff done but i would be showing you the easiest way you can remove them and stop the redirections instantly.
Read also:How to Add Smiley Buttons to Your Blog

Steps:

  • Firstly, Login to your blogger dashboard.
  • Locate theme and click on Edit Html.
  • Here, Open your search box and search for the text used on the template. Which could be all rights reserved or made by Emmanuel 
  • infront of the text you will notice a code added to it. At the exact spot you see the links. o your blog. Just add this script to it.


style='visibility:hidden'
Read also: How to Add Gadgets to Mobile View on Blogger

After adding that line to the script save your template and refresh your blog. The new changes would stay and the redirections would stop immediately. Did you try this and it worked for you? kindly drop your comment.


Sunday, July 30, 2017

2:46 am

How to Insert AdSense Or Affiliate Ads in-between post

After many searching i finally got the way you can insert affiliate links inbetween your blogger post. Normally, i my first thought about adding ads to blogger post is by editing my HTML. in which i was very wrong.The steps are very simple but i notice many do not know how to get it dine and it is very close to them. So on adding affiliate links in-between our blogger post would be the purpose of this post. Without wasting much of your time i would go through the steps to add ads to post.in which i feel would increases the amount of clicks you get on the ad and enable you to make more money on the ads.

 ADDING ADS INBETWEEN BLOGGER POST

  • Firstly, Log in to your blogger dashboard.
  • Locate settings and click on it.
  • The after Basic, You will find Post, Comments and sharing  and click on it.
  • So, under posts locate Post Template.
  • The box provided would be where you paste your ad codes.


So to control which part of the post should they be located is very easy and simple. Whenever you want to make a post after adding the ad codes to post template it would automatically pops up on your editing screen. So from there you get to determine which area of the post you want them to be. Do you experience any difficulty or did you try this and it worked for you kindly drop your comment below.

Tuesday, July 25, 2017

1:14 am

How To Add Smiley Buttons To Your Blog

Smiley i would describe in my words as an humanoid ready face which could match an individual's personal or emotional state at point in time. Smileys has been gaining wave as far way back as 1963 which the colors are mostly yellow. So, on this post adding smiley buttons would be the main focus here, whereby you can use this buttons to get reactions from your readers on your post which could justify whether the post id good and they are fine with it or the code is the other way round. Adding this to your blog is simple and i must say this is one of the best widget you can add to your blog. It basically allows users to leave feedbacks without dropping their comment.


Steps;

  • First and foremost go to vicomo.com
  • Here. sign up with your blog name, your website and your e-mail address.


  • Now you would be provided with a large different range of smileys and all you have to do is to pick the one you would like to add to your blog.
  • On the next page, You would be given codes to add them, Just copy them.


  • Now, Log in to your blogger dashboard and go to EDIT HTML.
  • Then press CNTR+F to open your search box and type <data:post.body/> and search.
  • Paste the code provided for you earlier right after <data:post.body/> . Then refresh your blog and the smiley buttons would appear.

Did you try this and it worked for you? kindly take some of your time to drop your comment. 

Having issues dropping your comment? kindly click here


Thursday, July 13, 2017

11:01 am

How to Add Gadgets to Mobile View on Blogger

hey...Are you a blogger having difficulty adding gadgets to your mobile vieew? firstly know that getting them to appear on your mobile view is very simple and that would be the purpose for this post and i will be putting you through on this post.
On a nomsy default templates on blogger only displays gadgets like Header, blog, page list and other attribution.But, when using a custom templates instead of the default you will be able to add more gadgets as you please from your PC view to your mobile view template and this is easily done by setting your template on "custom" via the template section on your dashboard.
So after setting your template to custom just follow the steps and example and you would be having zero issues in setting yours also so lets get started.

Adding Gadgets to Mobile View on Blogger

  • First of all login to your blogger dashboard and make sure you know the name of the label you would be adding.
  • Locate template and click on Edit Html.
  • Search for the gadget you by pressing CTRL+F and you can also use jump to widget and tap on the widget id and you would be moved to the widget code.
normally the code should look like this 

</bLwidget id='HTML31' locked='false' title=" type='HTML'>...</b:widget>
  • so to make the gadget appear just just add mobile="yes" and the new code should look like this;
</bLwidget id='HTML31' locked='false'  mobile="yes" title=" type='HTML'>...</b:widget>


  • Now, you can tap on SAVE THEME.
After saving then refresh your blog on your mobile view and the gadget you worked on would be added to your mobile view and if you want the label to appear only on mobile view and not the PC just use mobile="only" then the gadget appers on pc view alone


Wednesday, July 12, 2017

11:01 am

How to customize your comment box on blogger

its been a while that i posted stuffs on this blog and am very sorry and the reason is was made known to members on our whatsapp blog group. you can also join via this Link. if you have been visiting other sites which comments are allowed you must have noticed their comment box looks very different and more stylish much more looks better in sight compared to the default comment box on blogger. So on this post i would be personally dropping the scripts am using for mine and if possibly you like it you can also make use of it if it matches your template or you just want.


Procedure


  • Firstly, log into your blogger account or profile
  • Locate themes then click on EDIT HTML.

NOTE: Make sure you backup your templates in case of mistakes to roll back changes.

  • You can make many changes to your blog via your HTML and at the same time mess everything on your blog. press CNTR+F to search using your pc and enter ]]></b:skin> and if possibly its not displaying the result just searcj Skin probably after pressing enter twice or trice it should bring ]]></b:skin>
 

  • Then copy the codes below and paste it above ]]></b:skin>


.comments h4
{
color:#ffffff;
display: inline-block !important;
background:#292832;
padding:10px;
}
.comments .comment .comment-actions a {
background:#292832;
border-radius: 5px;
color: #ffffff;
font:12px georgia;
margin-right: 8px;
padding:5px;
text-decoration: none !important;
}
.comments .comment .comment-actions a:hover {
background:#808080;
border-radius: 5px;
color: #292832;
font:12px georgia;
margin-right: 8px;
padding:5px;
text-decoration: none !important;
}
.comments .comment-block {
background:#f8f8f8;
border: 1px solid #f0f0f0;
padding: 10px;
}
.continue
{
border-top:none !important;
}
.continue a {
background:#292832;
border: 1px solid #292832;
border-radius:5px;
color: #ffffff;
display: inline-block !important;
margin-top: 8px;
padding:5px;
text-decoration: none !important;
font:12px georgia ,arial;
}
.comment-header a {
color: #222222 !important;
}
#comments .avatar-image-container img {
border:2px solid #292832;
border-radius: 50px 50px 50px 50px;
height: 58px;
max-width: 58px;
}
.comments .avatar-image-container {
border: 2px solid #FFFFFF;
border-radius: 34px 34px 34px 34px;
box-shadow: 1px 1px 3px #dcdcdc;
float: left;
margin-left: -20px;
max-height: 61px !important;
overflow: hidden;
width: 61px !important;
}

So if you followed the given scripts above carefully you should encounter no problem and if its not showing still with the stuff above then trying pasting the codes between ]]>-</b:skin>. like this
  ]]>THE SCRIPTS HERE</b:skin>.
So if the script worked for you kindly drop your comment.


Monday, July 03, 2017

10:23 am

How to customize your scroll bar and text color on blogger

Have you ever had the intention of changing your blog text color ,the width of your blog or the scroll bar of your blog specifically on blogger?. You can see a perfect example on our blog using your PC. We customized the scrow bar in which you can also do the same easily without any issue. Surely, you can also do the same. It makes your blog more colourful and more professional. So on this post customizing our scroll bar would be what we would be dealing with. Follow our steps carefully and you wouldn't encounter any issue at all.

Read also:How to fix page not found on blogger

Steps in customizing your scroll bar

I hope you're aware that the default scroll bar color for almost all browser is grey in which you can change the height, width and the scroll bar track bar track color scroll color when active thumb over and color. In customizing all this we would be making use of CSS (cascading style sheet) so let's get started.


  • Firstly, login to your blogger dashboard
  • Go to theme. And back up your template to enable you undo mistakes in case you make any.
  • Click on Edit html.
  • Click any where in the code arena and press CNTRL+F to enable search.
  • Now type in ]]></b:skin> and press enter.
  • Then paste the script below just above this code ]]></b:skin>.
 /*--------- Scrollbar Customization code--------- */
::-webkit-scrollbar {
width:8px;
height:8px;
}
::-webkit-scrollbar-track {
background:#FFF;  /*------This is background color of scrollbar track ------*/
-webkit-box-shadow:inset 1px 1px 2px #E0E0E0;
border:1px solid #D8D8D8;
}
::-webkit-scrollbar-thumb {
background:#c0392b;  /*------Thumb color ------*/
-webkit-box-shadow:inset 1px 1px 2px rgba(155,155,155,0.4);
}
::-webkit-scrollbar-thumb:hover {
-webkit-box-shadow:inset 1px 1px 10px rgba(0,0,0,0.4); /*------Shadow on hover------*/
}
::-webkit-scrollbar-thumb:active {
background:#333;   /*------Thumb color when it is active------*/
-webkit-box-shadow:inset 1px 1px 2px rgba(0,0,0,0.4);
}

  • Through with that? If yes click on save.

Customizing text color.

Customizing text color simply means when someone highlights a text on your blog. The color it changes to is what we would be customizing here.
Just like the previous locate  ]]></b:skin> paste the code below.

/*--------- Text selection Customization code------------- */
::selection {
background:#e67e22; /*------background color on selection-----*/
color:#fff; /*------text color on selection-----*/
}
::-moz-selection {
background:#e67e22; 
color:#fff
}
::-webkit-selection {
background:#e67e22;
color:#fff
}
You can change the colors to the one that suites your blog and press save.
You've just changed your scrow bar and highlighted text color. Encounter y issue? Did it work for you kindly male effort by dropping your comment. Kindly subscribe to our blog not to miss our update.

Thursday, June 29, 2017

8:01 am

How to fix custom page not found on blogger


Basically this means that the page you’re trying to get to is unavailable or doesn’t exist. If you’ve followed a link and got this error page, it usually means one of two things:
  • Link doesn't exist 
  • The link has been updated


Blogging has been fun most of the times. But have you ever opened a page on a blog or a website and you see "Custom page not found" what do you after seeing that.. Am sure you will leave the page immediately. The good stuff is that you can fix thus stuff easily on blogger on your dashboard. Instead of seeing the custom page not found you can decide on what to be seen when readers see the page not found normally links would be the stuffs that would be added and it's purely HTML which shouldn't give you any issue editing it. Firstly the choice of word to be used must be enticing, it must have contents that would move the reader to click and the links must be valid..Make sure you remove


http://naijabrainies.blogspot.nl/2017/06/how-to-add-flying-twitter-bird-to-your.html?m=1 the ?m=1 

leaving it with .html...?m=1 tells the browser to open a page in mobile view while ?m=0 tells the browser to display the page in web view. So on this post controlling the error page to show links instead of error page would be what we would be dealing with and not getting your readers to dash out of your blog.


Read also:how to submit your sitemap to blogger bing and yahoo search engine 


Steps to fix page error
  • Firstly, log into your blogger dashboard
  • Locate settings and click search preferences
  • Under Errors and redirection under the heading you will see custom page not found then click edit.


There if you know HTML already just click on the set and make a your enticing write up to make the reader to stay. Or so you have issues composing one? Just copy the one I made below and edit to suit your choice.


<h2>Oops!</h2><p> <h3 align=”left”> Sorry that the page you are requesting isn’t available in our blog.</h3></p>
<p align=”left”>But, here is the <strong>3 Best posts</strong> I’ve picked for you which can be useful to you.</p>
<ul align=left>
<li><a href=”http://naijabrainies.blogspot.com.ng/2017/04/how-to-get-up-to-1k-facebook-likes.html” target=”_blank”>How to get up to 1k likes on Facebook</a></li><br/>
<li><a href=”http://naijabrainies.blogspot.is/2017/04/top-android-games-and-psp-with-active.html” target=”_blank”> Top PSP and android games with active download links</a></li><br/>
<li><a href=”http://naijabrainies.blogspot.com.ng/2017/05/how-to-add-awesome-share-and-social.html” target=”_blank”> How to add social and share buttons to your blog</a></li></ul>
<p align=”left”>And, I suggest you to visit our<a href=”http://naijabrainies.blogspot.com/”>homepage</a> where you can see some of our best posts.</p>


That's all. So instead of users to see the error page this would be seen instead.

Kindly subscribe to our blog below to be the first to get our update in your mail📩

Sunday, June 25, 2017

9:57 pm

How to submit your sitemap to google,bing and Yahoo

I know the first thing that would be on your mind is What are sitemaps . well, sitemap is a file in XML format with the list of the whole pages in your blog. Sitemaps helps and improve the rate in which your blog would be crawled and also helps search engines like GOOGLE, YAHOO And BING to Index your blog post.
Well, submitting a sitemap to search engines would will tell them about your blog and the contents present on your blog. Want to learn more about sitemaps? Just click Here


So on this tutorial getting your sitemap and submitting them to search engines would be treated on this blog with completely safe steps so as to ensure your blog not ending up being messed up.
However, Blogger's default sitemap contains only 25 latest articles on your blog. You can take a look on your blog sitemap.


Steps on submitting your maps to search engines
  • Firstly, log on to Google search console
  • Click the blog name you want to add the sitemap.
  • Locate crawl and clock on Sitemaps
  • Locate the "ADD/TEST SITEMAP located at the upper right of that page and paste the code below.
atom.xml?redirect=false&start-index=1&max-results=500


  • Click on submit sitemap and reload the page.
  • With this step you have successfully submitted your sitemap to Google search console and also remember the above sitemap will work for 500 post and perhaps if you have more than 500 post. Use the code below instead.
atom.xml?redirect=false&start-index=501&max-results=500

Or do you still have more post than 500 probably 100 use the code

 atom.xml?redirect=false&start-index=1001&max-results=500

With the following instructions and codes you've successfully submitted your blog sitemap and your post will appear on blogger and your blog would be crawled.

So next we would be dealing with submitting your blogger template to yahoo and Bing. Note that your post and blog wouldn't appear on yahoo and Bing without submitting your sitemap.


Steps to submit blogger sitemap to yahoo and Bing

The yahoo site explorer was merged with Bing webmaster. So if you submit your sitemap to bing it will automatically appear on Yahoo and Bing search engines. Just follow the steps carefully.
  • First of all log into  Your bing webmaster tool 
  • If possibly you do not have an account just sign up. The steps are simple and doesn't really need any special step.
  • Locate ADD A SITE
  • Type in your blog URL in which you want to submit the sitemap
  • Then, type the following line to the ADD SITEMAP field.
http://your-blog-url.blogspot.com/atom.xml?redirect=false&start-index=1&max-results=500

  • Don't forget to replace your blog URL with the example stated Above.

  • Click on the "ADD" button
  • Here, you're in the verifying ownership page. There and e different methods to verify but I will strongly recommen the Meta tag method. I believe its simpler.
  • So, using the meta tag. You'll be given a code to add the template of your blog.


  • Now search for the <head> tag or just hold CNTRL+F to search for the tag.
  • Then paste the code below the <head> tag.
  • Click on SAVE TEMPLATE.
  • So on the bing webmaster tab and click on verify.
  • If you have more than 500 post then submit the sitemap with the code below.
http://ur-blog-url.com/atom.xml?redirect=false&start-index=501&max-results=500

If you have more than 500 post use the code belowbelow

 
http://ur-blog-url.com/atom.xml?redirect=false&start-index=1001&max-results=500

It takes some time before yahoo and bing can start indexing your blog post.


Do you find the article really helpful? Kindly drop your comment and share with friends.


Tuesday, June 06, 2017

10:57 pm

How to Add flying Twitter bird to your blog

This one of the coolest HTML/JavaScript widgets ever this code helps users who reads your article instantly share to their Twitter and also follow you to get more of your update.

The Flying Twitter bird only appears on your web view. 
Adding the code is very simple and easy


Copy code
<!-- Animated Flying Twitter Bird Widget by naijabrainies.blogspot.com -->
<script type="text/javascript" src="http://yourjavascript.com/20801012195/twitter-bird.js">
</script>
<script type="text/javascript">
var twitterAccount = &quot;naijabrainies&quot;;
var tweetThisText = &quot; <data:blog.pageName/>: <data:blog.url/> &quot;;
tripleflapInit();
</script>
<!-- Animated Flying Twitter Bird Widget by naijabrainies.blogspot.com -->


Change "Naijabrainies "  to your Twitter username

Steps:

  • Log in to your blogger dashboard and click on "LAYOUT"
  • decide which part of your blog you want the code to stay.
  • Click add gadget and select "HTML/JAVASCRIPT"
  • Copy and Paste the code in the "HTML/JAVSSCRIPT" and save
  • Make sure you also save your arrangement
Refresh your blog and the Twitter bird shows up and start flying.

Still having issues getting it on your blog? Follow the approach Here


How easy was that.. Very easy I think

Monday, June 05, 2017

6:13 pm

How to open your blog on blogger in simple steps

Hello, on this tutorial I would showing you how to open your blogger in simple an most advisable steps.Opening a blog is simple but maintaining and designing the blog is where problems can arise. Don't worry on Naijabrainies.blogspot.com we've got you covered.we would be giving steps on how to make your blog look cool and to get more gadget this beven make it look cooler.

Steps in opening your blogger

  • Firstly log on to blogger Here and this is where all successful blogger started

  • So when you're logged to blogger click on create your blog and wait while it loads


  • You insert your gmail account and login using the account info and if you don't have a blogger account just click on create account and insert your details and you may be asked to create your G+ account and you may decide to upload your picture or not
  • So on the next page when you've successful logged in

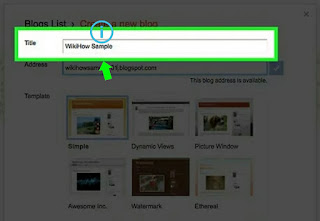
Inset your blog title and your blog address

Note: Make sure your blog title and your blog address must be something you like and this must be a name that can be used to point to your readers like Naijabrainies.blogspot.com where a member can be called a brainy.Hope you're getting my point.

  • Make sure your blog title also reflect on your blog URL
  • And wait while it confirms if the addressed you choosed is available

  • Then select your default theme and click on create blog

  • Click on theme and then click on customise
  • You can upload your theme or contact us we have one cool and responsive template for sale
  • Then select backup/restore  to upload your template


  • And if you can edit HTML you can customise stuffs on your blog

Read also:Learn HTML easily here


  • Then start posting and making your blog more popular keep posting😋


Friday, June 02, 2017

9:48 am

Learn HTML, CSS and other languages

A big sorry to all brainy reading. This ought to have been the first post on blogging tricks Am really sorry.


I was once left with no clue or idea of what HTML or CSS is nor how to even run them.Later I went for a program and I was taught so on this tutorial I would be showing what helped me to get along and understand the HTML and CSS and they are the back bone of blogging. I want you to look at them in the perspective of HTML and CSS being instructions. They do whatever instruction you give to them.
Even though you might be learning them from someone but believe me or not you can't get everything or remember everything you're being right in the class it wherever you're being tutored.
So on this tutorial I would be sharing 2 files that work hand in hand to make you get what HTML and CSS all about

Requirements:

  • Get a PC to test the codes
  • Check Google if you're not getting a line I recommend w3 tutorial point
  • Have the mind set of trying again when you make mistakes


Kick star :

  • Firstly download solo learner Here
  • Install adobe reader Here
  • Install and open the solo learner
  • Download HTML PDF Here
  • Download CSS PDF Here
Note: Do not skip any chapter here they are all compulsory if you really want to get codes and use em

After getting and understanding the pdf install the app


  • Register by putting your details

  • Choose your preferred course you will like to take

  • Start your course. This app helps you to understand the codes more and analyse you


  • You can save for offline reading and take tests also
  • Unlock stages by taking test and giving correct answers

Why the PDF first?:

The PDF gives basic understanding of the codes better than the app do using the app wouldn't be difficult when you see questions


Wednesday, May 31, 2017

4:40 pm

How to add facebook page plugin to your blog

If you have been the type of person that checks other blogs maybe tech,music or
relationship you ought to have noticed the Facebook page plugin which connects their Facebook page to their blog. Having a Facebook page for your blog makes you know the type of people reading your articles it makes you get closer to your readers to know what they really want or expect from you. At times when you check the developers option on fb and you copy the code it pops and show an error message when you want to save the changes you've made. So on this tutorial getting the Facebook page plugin to your blog with easy steps and safe Scripts would be given.


Also read:How to add share and follow buttons to your blog


Steps to add the Facebook page plugin to your blog

  • Login to your blogger dashboard Here
  • On the dashboard select Layout

  • After clicking on layout Layout. decide on where you want the plugin to be and click on add gadget


  • Wait till it shows a pop-up and select HTML/JAVASCRIPTJAVASCRIPT
Insert the code below in the box provided you can also decide not to give it a name

<iframe src="https://www.facebook.com/plugins/page.php?href=https%3A%2F%2Fwww.facebook.com%2Fnaijabrainies&tabs&width=300&height=200&small_header=true&adapt_container_width=true&hide_cover=false&show_facepile=true&appId=485204778165246" width="300" height="200" style="border:none;overflow:hidden" scrolling="no" frameborder="0" allowtransparency="true"></iframe>

Note: change "naijabrainies" to your page name

  • After adding the scripts. Click on Save and the save arrangement also
  • Refresh your blog and the plugin will show
Do you like the article? Kindly click Here to like our page and never miss any of our post